Hosting a server
Hosting a server
To host a server that allows Windows, Android, iOS, and Mac clients, use this minimal example:
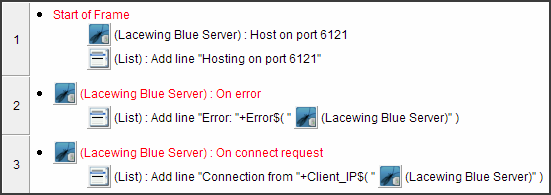
As a side note, you should never report errors in a way where the last error is erased to put the new one in its place, otherwise repeating errors and errors that occur close in time to each other are hidden.
For example, setting a String object to display the error breaks this rule.
Read more about proper error reporting on Tips.
To host for HTML5 and UWP clients as well, finish reading the below topic, then go on to read the Hosting a WebSocket Server topic.
How do you connect to your server once it is hosting? The connection options depend on where the machine you are using to connect from is located (the client machine), as there are different IP addresses depending on how the client and server machines share a network.
Read more below.
Networking levels
There are three levels of networking your app has, or how accessible it is.
Local host (loopback)
By default, by simply using the Lacewing Blue/Relay Server object's Relay Server > Host action, the Relay Protocol server will be available to clients on the same computer it's hosting from.
Connecting to the localhost address "localhost", the loopback IP addresses "127.0.0.1" (IPv4) or "::1" (IPv6), will result in the client program trying to connect to a server program on the same machine the client program is on.
This is called loopback, because the connection from the client program is outgoing and "loops back" to the server program as an incoming connection, without leaving the machine.
You can use a loopback connection even without a network connection, or even a network card, making it useful for testing.
However, if you're looking to connect with other machines, you'll need to read on to the LAN explanation following.
Local area network (LAN)
LAN, or local area network, is the shared network of all the devices connected to the same router. These devices all have unique local IP addresses, otherwise known as LAN IP addresses.
Windows
If you're hosting your server on a Windows machine, to enable LAN access for your server program, all you need to do is add the server program to the server machine's firewall settings, so it can accept incoming connections.
Generally, when you first start hosting the server, Windows Firewall will pop up after blocking it, and ask whether you want to allow it. This is normal to all server programs, including LAN multiplayer games.
If you have a third-party antivirus, not Microsoft's built-in one, there is a possibility your antivirus on the server machine will have its own settings independent of the Windows Firewall, causing that antivirus to block incoming/outgoing connections, so check that the antivirus has it unblocked too.
For example, Windows Firewall might be set to allow the hosting/connection but Avast/Norton/etc. is blocking it.
You can look up the local IP of a machine using Fusion extensions like LocalIP++, or by running Command Prompt and using the ipconfig command, on the server machine.
Be careful you don't run it on the client machine, it'll give an IP that is irrelevant. You want the hosting machine's IP.
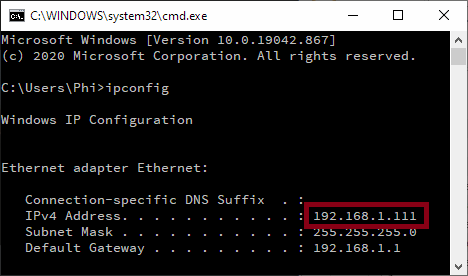
Example of ipconfig.Typically, local IPs start with 192.168.x.x, 10.x.x.x, or 172.x.x.x.
There may be multiple network adapters with different IP addresses; don't use the IP from an adapter with "virtual", "loopback" or "vpn" in the name. If you see "Ethernet", that's a plug-in wired adapter.
Android or iOS
If you're hosting your server on Android or iOS device, you should not need to worry about firewalls; permission to access to the internet was granted when you installed the server-containing app, and approved its requested permissions.
On Android and iOS, to get your current local IP address, try going into your Settings app, then going on your WiFi settings.
It should display your current IP like so:
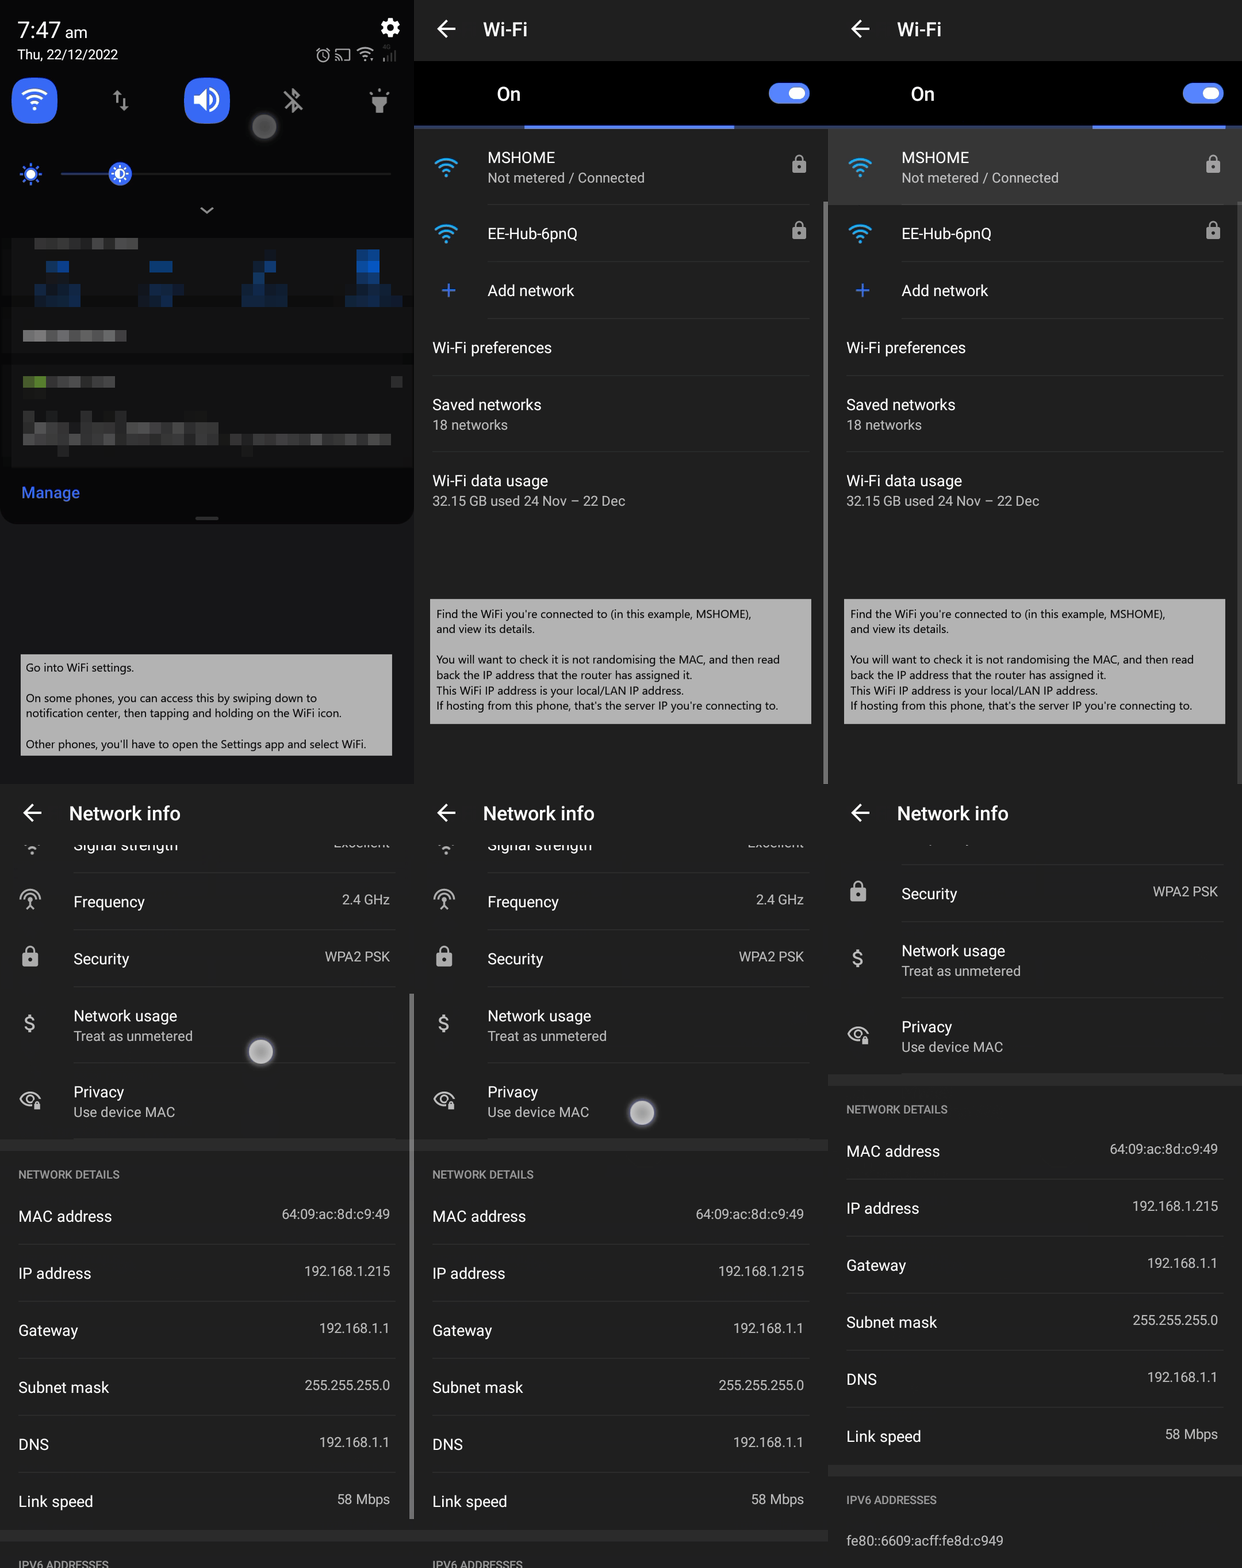
You may have to tap and hold on your WiFi network name to bring up information, or press a gear modify icon.
You can also read the local IP by looking on Settings > About > WiFi, or getting a system specs app that can read it for you.
(If you are an advanced user, you could also view the IP on your router, but you'll need the phone's MAC address and probably the router's admin password.)
Mac
On Mac, you can read the current IP by going into System Preferences > Network and selecting your current Ethernet or Wi-Fi connection.
It should say it under Status.
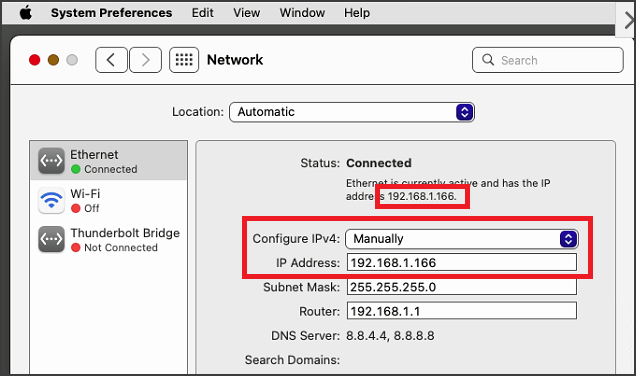
The first red box shows your local/LAN IP address. The second is how to configure it for static IP, if needed.
(You can also view your IP address via Terminal command ifconfig., but it's pretty hard to read.)
How to connect to LAN
Regardless of server machine's OS, you can connect to the server program on your server machine, from any device in your local network, by connecting to the server machine's local IP address, with the port the server is hosting on.
Using the above example, local IP 192.168.1.111, clients on the network need to connect to "192.168.1.111:6121", if you're hosting on port 6121. You specify the port in the server host action.
The LAN IP will also work for the server machine connecting to itself, sort of like localhost, so you can run a test client on your server machine and connect to your LAN IP to see if it works.
- If the server machine connecting to its own LAN IP fails, you're using the wrong IP address to connect to.
- If it works, but another client on the network can't connect, then the other client is probably using the wrong IP address, or hasn't allowed the client program on its firewall.
Like with the server, the Windows Firewall prompt should appear the first time you try to connect with the client, as the firewall blocks it. If you miss the dialog, go into the Windows Firewall control panel option.
If you have an extra non-Microsoft antivirus, also check it has the application allowed in its firewall.
Long-term hosting on LAN/internet (advanced)
If your local IP address is dynamic (described below), then the router uses a technology called DHCP which gives your device a new local IP each time it connects. This local IP expires and is refreshed every x hours or days.
Normally, the router keeps these assigned local IPs the same if the local device is consistently connected, but it can reassign a different IP address, usually if the server machine goes offline for too long, or if the router is restarted.
You don't need to be concerned about your IP address changing, or keeping your local IP as a fixed address, unless you plan to host for days or longer, or expect to go offline on your LAN.
If you do plan to do that, these steps below will lock your server's LAN IP to a fixed one. Even if your WiFi or device turns off, your device will have the same LAN IP address, which means LAN games can always connect to the same local IP, and it allows port-forwarding to work consistently. See below.
Windows
To set a fixed IP address on Windows:
- if using Windows 10 or later, then look at how to assign a static local IP for your LAN network here.
- if using earlier than Windows 10, look at how to assign a static local IP on your network adapter here.
(Note that this method will apply to all networks you use for that network adapter, which will mean if you set a static IP up for your WiFi/wired network at home, then go to another building, like your workplace or education, and try to use their WiFi/wired network, you may not be able to get on!
In that case, you may have to manually reset the adapter back to automatic IP in order to use the other networks. You might want to use Alternative Configuration, which will make connecting at home slower but will mean you won't have to reset. Or, you can assign the fixed IP for your device on the router instead.)
Android/iOS
To set up a fixed IP address on Android or iOS:
- Go into your Settings > WiFi page
- Tap and hold on your WiFi network, or press a gear icon next to it, depending on device.
- Change IP setting from "Automatic" or "Automatic (DHCP)" to "Manual" or "Static".
- Make sure you know your current gateway/router, netmask, DNS, etc – you can read these from the WiFi information before you start modifying.
If you get it wrong, reset it back to Automatic; your WiFi should come back on.
A sign of getting it wrong is no internet at all, or not able to load new websites.
This should lock your IP to a static one. Even if your WiFi or device turns off, your device will have the same LAN IP address, which permits port-forwarding.
Mac
To set up a fixed IP address on Mac:
- Go into your System Preferences > Network page.
- Select your Wi-Fi or Ethernet (wired) adapter you're using.
- To make your local IP static, you'll need to edit the Configure IPv4 setting, either to "Manually", or "Using DHCP with manual address".
- Make sure you know your current gateway/router, netmask, DNS, etc – you can read these from the WiFi information before you start modifying.
If you get it wrong, reset it back to Automatic; your network should come back on.
A sign of getting it wrong is no internet at all, or not able to load new websites.
This should lock your IP to a static one. Even if your WiFi or device turns off, your device will have the same LAN IP address, which permits port-forwarding.
Setting a fixed IP up on router (Advanced)
It is possible to set up a static IP assignment in the router's settings, based on MAC address of the server machine's network card.
These settings are on most, but not all routers; you'll have to google how to do it for your router model.
The router model is normally printed on your router. Do a search for "(router model) static LAN IP".
To change your router's settings, you will need your router's admin password, which is again, normally printed on the router.
Warning: Your device may randomize its MAC address. That's bad, as the router uses MAC addresses to keep IPs the same for devices.
Check your network settings, particularly on Android and iOS; you should be able to disable this behavior on a per-network basis.

If you can modify your router settings, why not set up port forwarding? See below.
Internet
To host for clients on the internet, first follow the steps for LAN hosting and long-term hosting above, then continue reading this section.
Internet hosting has a couple extra steps.
First, you'll have to look up router port forwarding, so internet-originating connections can be passed, from the internet outside of your router, to the local IP of the server machine on your local network.
In your router's settings page, you'll have to unblock any ports your server uses.
- Lacewing Relay Server: unblock the Lacewing Relay port (usually 6121) on both TCP and UDP.
Typically Lacewing Relay/Blue Server uses port 6121, but you specify it in the Relay Server > Host action. - Unblock the Flash policy port if you're using that; Flash policy uses TCP 843, always, as Adobe requires it.
- Lacewing Blue Server's WebSocket server will use HTTP port TCP 80 and HTTPS port TCP 443 by default, as HTML5/UWP clients use HTTP/HTTPS to start a WebSocket connection, then move to a WebSocket format.
You specify the port in Lacewing Blue Server > HTML5/UWP Servers > Host WebSocket server(s) action. - Lacewing Webserver: the typical port for HTTP is TCP 80, and HTTPS is TCP 443.
You can specify it in the Lacewing Webserver > HTTP Server > Host action, and Lacewing Webserver > HTTPS Server > Host action.
If your router asks for both internal and external port, then use the same port numbers for both of them.
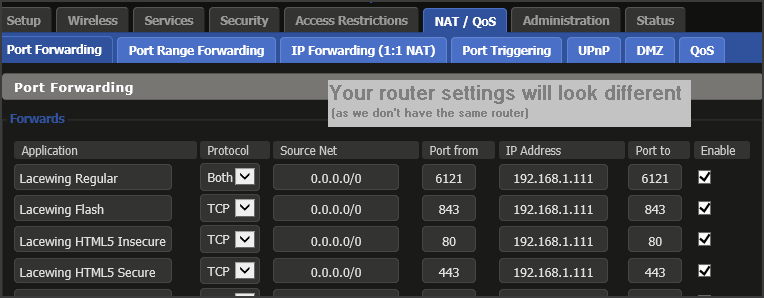
After port forwarding on the router, you should have access from anywhere on the internet to your Relay/Blue Server.
Test it by attempting a connection via your remote IP address; you can find your remote IP on this webpage, or from a simple Google search "what is my IP".
When connecting, don't forget to put in the port; see examples of how under the Relay Client > Connect action.
If a connection to your remote IP fails, but connection over LAN (by connecting to local IP) works, you may have your Internet Service Provider (ISP) blocking incoming connections on their firewall before it even reaches your router.
For the ISP to unblock, you will have to talk to your ISP to get it unblocked, or use their control panel settings.
Internet hosting via domain
If you are trying to use a domain, so "example.com" goes to your server, you will have to sign up with a DNS provider. DNS providers maintain lists of domains and their remote IPs.
DNS hosting is normally a paid service, usually $5-15 a year. DNS hosters will not hide your remote IP address; it is necessary to give that to clients to connect to.
DNS registrations are usually required to give a physical address as well, like the building the server is in, so be aware of your privacy. Some providers offer to hide your details, usually for extra cash.
Static and dynamic IP
A static IP address is an IP that is kept the same by your Internet Service Provider (ISP) regardless of whether the router reboots or otherwise disconnects from the ISP.
The opposite is dynamic IP, which can be changed by a router disconnect/reboot.
Usually, ISPs provide dynamic IPs, and give static IPs as a paid add-on to your ISP package.
If you do not use a static IP, then you will need to sign up to a dynamic DNS service (sometimes called DynDNS or DDNS), which your router may have built-in support for.
A DynDNS service will host its own DNS records, and update whenever your router's IP changes. They normally give you a subdomain of their main website (e.g. HopTo service may give you "yourusername.hopto.org"), and manage all requests to that subdomain by redirecting them to the router's IP, like a normal DNS would.
You can then connect on any computer to "yourusername.hopto.org" and get through to your Lacewing servers, provided you've done port forwarding and other steps described above.
DynDNS are often free, and automatic updating is built into some newer routers. A common DynDNS service is NoIP.com.
It is better to use a static IP for serious long-term hosting, as it will not use a third-party service or require you to use their domain.
It's worth noting IP addresses for a domain are cached, and if your IP changes, then any clients with that cached IP may fail to connect for several days, until their cached records expire.
It is possible to change how long DNS records are cached, and DynDNS make use of this feature, but without a cache the apps have to look up the IP each time.
You can clear your OS's DNS cache by using Command Prompt command ipconfig /flushdns.
Note that some web browsers use their own cache, which you can clear from browser settings – but this will only affect the HTTP/HTTPS Lacewing Webserver.
IPv6
An IPv4 address will always be in the format "###.###.###.###" as above, where ### are numbers between 0 and 255, inclusive.
An IPv6 address will be in four-digit hexadecimal (0-9, A-F) blocks separated by colons. As an example; "2001:0000:3238:DFE1:63::FEFB".
Due to IPv6's lengths, various shortening methods are applied; for example, 0063 will be reduced to 63, and whole blocks will be removed if not used.
IPv4 addresses mapped to IPv6 will look more like "::ffff:52e5:db02". Note that Blue will converted IPv4-mapped IPv6 addresses to their IPv4 counterpart for any IP expressions.
Relay doesn't support IPv6 due to bugs in the design, rather than by intention.
IPv6 is less widely adopted than IPv4, but is becoming more of a necessity, as many regions were assigned small IPv4 blocks that couldn't be distributed sufficiently. For example, India and Asia have too small a block of IPv4 to match their growing population and technology.
Your ISP should support IPv6 connections, but if they do not, there is a good chance IPv6 clients can still access your server via technologies like 6to4 or Teredo tunneling (these are done by the client's ISP, and invisible to the end users). But these technologies aren't a fix-all and you run the risk of losing the clients that aren't able to use those, so you should try to find an ISP or hosting service that supports IPv6 natively.
For more reading on IPv6, see here. You can test if your computer can use IPv6 here.
Securing your server
You should read the Security and Tips topics to better secure and speed up your server.
There is also an example on IP banning in Security.
Setting up a VPS
If you are planning to buy a server machine, there are several points to consider:
- Check the server specs.
Note that any Blue Server that runs, regardless of server machine OS, will support all Blue Client runtime types; just use the right host actions:
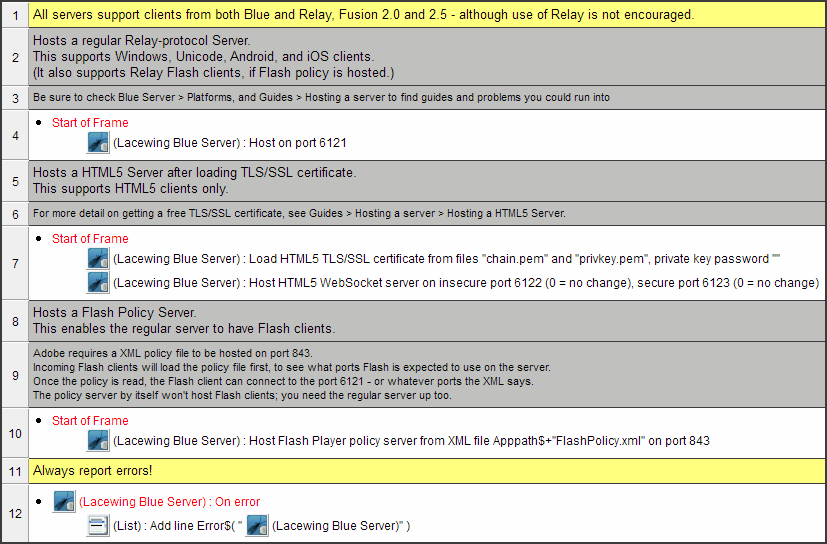
Blue Server will support Relay Client as well, including Relay Android and Flash, but you shouldn't be using Relay Client.
You can host from home, if your Internet Service Provider permits it, and you don't mind running your computer all day.
Refer to the above topics about how to make your server accessible from the internet.
To check your server machine has good specs to run, check this list:
- Supported server machine OS
There are several server types available that support Relay:
- You can write your own custom Windows/Android/iOS/Mac server app in Fusion.
You don't need a Windows Server OS; a normal Windows OS is fine. Similarly, you can host cross-play servers from a regular Android/iOS phone, or from a regular Mac device.
For Fusion server events, see the example at the top of this Guides > Hosting a server topic.
Read Guides > Tips and Guides > Security to get it working fast and safely. Blue has several features to prevent abuse, such as preventing similar client names, some DDoS protection, and allowing you to limit text to ranges. You can also add your own message filtering and blocking in Fusion events. - bluewing-cpp-server is written in C++, created by Darkwire Software, the creators of Lacewing Blue (and this help file).
The bluewing-cpp-server program uses C++ only, with no Fusion UI involved, so it's very fast.
It runs on Windows XP and later, but it also runs on Linux-based devices, including Raspberry Pi. - RedRelay, written in C++, by LekKit
For OS compatibility, message LekKit to ask – he often will edit RedRelay to support your server if it's not too much work.
It does not support HTML5 or UWP clients. - pylacewing, written in Python 2 by Mathias, and abandoned.
For OS compatibility, check for Python 2 support. Most platforms including Mac should be supported.
However, the speed will be slower than a C++ server, and you won't get support.
It does not support HTML5 or UWP clients.
- CPU cores:
It's recommended you take a VPS that offers 2+ CPU cores. It's not required, but it helps.
If you have one core, and any program on the server decides to use all available CPU space – for example, stuck in an infinite loop – then the remote access won't have any spare CPU to let you connect and debug the problem, and you won't be able to run anything like Task Manager. Multiple cores gives it that capacity. - CPU speed:
Your CPU speed itself matters; Lacewing servers are fairly light-weight, with the bluewing-cpp-server particularly light. However, they are single-core programs, so they can only run as fast as one CPU core can run. - Bandwidth:
As you're the creator of the client, presumably, then you can optimize the bandwidth usage. Games shouldn't need to send all that much; video calls are the biggest bandwidth requirement.
Read the Guide > Tips on performance optimization; remember CPU usage and bandwidth are tied together, as % of CPU time spent processing messages increases for more messages, bigger messages, and for a slower CPU. - IPv6 support:
A percentage of the Internet can only use IPv6, so make sure your server supports it if you want full worldwide coverage.
UK-based servers often do not have IPv6 support.
Currently, Darkwire Software uses a low-powered Linux VPS and a Raspberry Pi 3B, both running bluewing-cpp-server, to host its public servers.
- Update the OS.
Once you get the OS, for security reasons, you should update the OS you're using to the latest available.
Disable automatic updating, unless you want your server going offline at random. Windows won't let you disable updates via the Windows Update settings, but you can disable the Windows Update service entirely.
Periodically, say 1-3 months, you should update your server OS again, manually.
Most Linux-based OSes won't automatically update by themselves. To manually update them, you typically have to use apt-get update followed by apt-get full-upgrade in a Terminal or SSH session. The exact method may vary per OS, but you can easily google it.
- If your machine has a password, consider changing it.
Also, consider adding a new user account to run your server programs in.
Don't lock yourself out of your new machine! Make sure you know what your password is.
- Get your server program copied onto the server machine.
You'll need remote access. Consider using a file-sharing app like Dropbox where you can regularly send new server versions.
You may want to use AnyDesk, or enable Remote Desktop Connection in Windows system settings, as both have file transfer capacity.
What is available will depend on your OS.
In a pinch, you could use a one-off file-sharing site, but those tend to have dodgy adverts.
- Set your server program as allowed in the firewall.
Some OSes automatically allow all outgoing connections, but refuse incoming ones. Make sure your server app is an exception on the firewall.
- Test your server program.
Try connecting to it using a Lacewing client, passing the server's remote IP – just look up "what is my IP" on Google from the server machine if you're not sure. Make sure to have the hosting port too.
Does it accept connections now? Don't leave it untested.
- Set your server program to start up again when the machine restarts.
In Windows, this can be achieved by the Task Scheduler.
In Linux-based OSes, this normally requires use of /etc/init.d, but it varies widely. Follow an online guide for your particular OS.
- Test the auto-restart on startup works.
Give it a bit of time, but don't leave it untested. If an auto-restart on startup doesn't work consistently, you'll want to know before the users find out the hard way.
If you expect to remote access frequently, you can set up an auto-login such as using Sysinternals AutoLogon; do that at your own risk. If you're using Remote Desktop Connection, you won't need to do this, as it signs you in by itself.
Currently a bug exists in Fusion runtime that requires you to restart the server every 24 days. Eventually, the Fusion runtime stops ticking over, so new connections will fail, channels won't close, etc, as they can't trigger their Fusion events. Ensure you have an auto-restart set up, or manually restart it.
Yves has already been notified and plans to have it fixed for the next Fusion build. The standalone bluewing-cpp-server is not affected.
And you're good to go!