Hosting a WebSocket server
A WebSocket server serves HTML5 and UWP clients, by embedding the Lacewing protocol inside WebSocket. Web browsers can only do live connection by repeatedly requesting a webpage, or by WebSocket.
To host a WebSocket server, it's best to get a SSL/TLS certificate.
The WebSocket side of Lacewing Blue Server can run two WebSocket servers with their own port:
- Insecure port
This can be connected to by HTML5 clients that are running from http:// webpages only.
The browser will block a connection from https:// webpages to an insecure port.
(UWP clients can use both WebSocket servers.) - To manually connect to a insecure socket in a HTML5 or UWP client app, connect with a "ws://" prefix.
For example, connect to "ws://server1.dark-wire.com/". - Data sent over insecure WebSocket is plain text, and can be eavesdropped on and manipulated by devices en-route.
- Secure port
This can be connected to by HTML5 clients that are running from http:// or https:// webpages.
You will need a SSL/TLS certificate to host the secure WebSocket server port.
(UWP clients can use both WebSocket servers.) - To manually connect to a secure socket in a HTML5 or UWP client app, connect with a "wss://" prefix.
For example, connect to "wss://server1.dark-wire.com/".
You do not need a certificate on the client side. - Data sent over secure WebSocket is secured via HTTPS technology, and is as secure as a HTTPS connection under the same circumstances.
- You can test secure ports have a working TLS certificate by connecting with HTTPS in a web browser; for example, "https://localhost:port/".
Note 1:
Relay clients using the WebSocket servers, and those using the regular Relay server, are merged together, and see each other without any distinction, on both the server and client side.
They both use the same ID lists, channel listing, channels, etc.
Note 2:
Lacewing Blue HTML5/UWP Clients use a fake UDP, where the WebSocket server translates intended UDP messages into TCP and sends them to HTML5/UWP Blue Client to trigger Blasted events instead of Sent. This happens invisibly.
It is also supported in reverse; HTML5/UWP Blue Client Blasted actions will still be sent over TCP, but will be translated to and forwarded as UDP by Blue Server if the receiving client is not HTML5 or UWP.
So all client platforms will seem to support UDP, with HTML5/UWP having no obvious difference.
So, you should not need to re-code your message events, but be aware the limitations of TCP apply to the UDP messages as well, for HTML5/UWP clients. See Types of messages > Sending versus Blasting topic for limitations and how TCP/UDP differ.
If you are having too many messages, consider reading Guides > Tips for performance tips.
Note 3:
The secure WebSocket server should be considered mandatory, if you are hosting for HTML5 clients at all.
Use of a secure WebSocket is required for HTML5 clients running on https:// webpages. Browsers will refuse to connect to an insecure WebSocket port from a secure webpage, for security reasons.
And HTTPS is expected everywhere. Secure connections are not just for privacy, but because without encryption, anyone in the middle can tamper with data coming over the connection; injecting their own JavaScript, pretending to be the server, or injecting false data, pretending to be the client.
Due to that, the Electronic Frontier Foundation has tried to secure all website connections; this was called "HTTPS Everywhere". Due to wide adoption of this, and the fact the calculations for encryption is built into CPUs, making encryption pretty efficient, offering insecure WebSocket connections alone is a bad idea.
Note that a certificate and its encryption does not mean the browser or server can't send bad or malicious data. There are checks on both ends for Blue, with the Blue server creating errors and immediately disconnecting anyone who sends bad data, and the client creating errors. But the usual rules about security apply in HTML5/UWP too.
So it is in your best interests to get a free certificate and host securely.
To learn how to do that, continue reading below.
Port warnings
Windows servers
If hosting a server from Windows, you should be aware Skype and the Windows HTTP service is usually running and will use port 80 and port 443, preventing Blue from hosting.
The Windows HTTP service allows multiple Windows programs to share the HTTP/HTTPS ports, but is not compatible with Blue as it doesn't support websockets.
If you're trying to use port 80/443, and getting port in use or access denied errors, try closing down the HTTP service.
To do this, open an administrator Command Prompt, and run:
net stop http
Note that this will disable several things, including the Print Spooler service, disabling printing for the whole OS. You may prefer to use a custom port instead.
If you want to find a process that is using a port, open PowerShell Administrator, and run a command:
Get-Process -Id (Get-NetTCPConnection -LocalPort 6121).OwningProcess
(Replace the port as appropriate.)
This will not find built-in Windows services using it; just regular EXE processes.
Services will mostly be web servers like Microsoft IIS, Microsoft Web Deployment Service, Windows Remote Management, Apache, etc.
In Network Connections folder, "Incoming Connection (VPN)" may also use the ports.
Android, iOS and Unix servers
If hosting a server from Android, iOS, Mac, etc., you may want to embed the certificate files. This is described below. Mobile platforms heavily restrict access to the filesystem, and it is hard to find certificate files by path.
Note that hosting on port 80 and 443, the defaults for WebSocket servers, will not be allowed on Android, iOS or Unix without rooting the device. This is because ports 1024 and lower are considered "privileged ports" on these OSes, and only administrators can host from them.
However, it's perfectly fine to host a WebSocket server on a larger port and connect with the port specified manually. You can also specify whether to use WebSocket or WebSocket Secure protocols from the client, by connecting with ws:// or wss:// prefix.
For example:
How to get a certificate
To get a SSL/TLS certificate, you have several options:
Free globally-trusted certificate
The easiest way is to find a free provider like Let's Encrypt or ZeroSSL, and use CertBot or an ACME client to obtain a certificate. Their websites should have more details.
Note that TLS and SSL are the same technology, only TLS is newer version of it. So "SSL certificate" is interchangeable term as "TLS certificate". They will both support modern browsers.
It's fairly complex to do the first time, so you may want to get support on the Clickteam Discord.
When you get the certificate files, they will usually come with 2-4 PEM files, and 2 of those are needed to host Blue:
- the certificate chain file (fullchain.pem, chain-only.pem)
- the private key file (privkey.pem)
On all server OSes, these two PEM files will work to verify your domain or IP address.
On Windows, you can get a certificate in a PFX format, which can merge the private key and chain file together. PFX with both combined is the preferred format for using with the Windows certificate store.
Free local certificate (self-signing)
For testing, you can also make your own TLS certificate, which is called "self-signed certificate". This is a certificate you generate yourself, and no computer will trust it.
You have to manually add the certificate to the local machine or current user's store for it to be trusted on any client machine you're using. There are several steps to this.
Step 1:
To create a self-signed certificate, and add it to Window's store, press Windows key and X, and select Powershell (Admin).
If only Command Prompt shows up, open Command Prompt (Admin), type powershell, then continue.
Enter the following PowerShell command:
New-SelfSignedCertificate -DnsName localhost -CertStoreLocation cert:\CurrentUser\My
This will generate a self-signed certificate for secure web browser connections to Lacewing Blue Server on the local machine.
This means connecting to:
- "https://localhost/", from a web browser on the server machine, or
- "wss://localhost:port/" from a Lacewing Blue HTML5/UWP client app, that is running on the server machine.
In addition to being generated, the certificate will be stored under Current User's Personal Certificate store. It has to be stored under Personal store, the PowerShell command won't work otherwise.
While this new certificate is valid, it is not trusted yet – the Personal store is not implicitly trusted. So we have to move it.
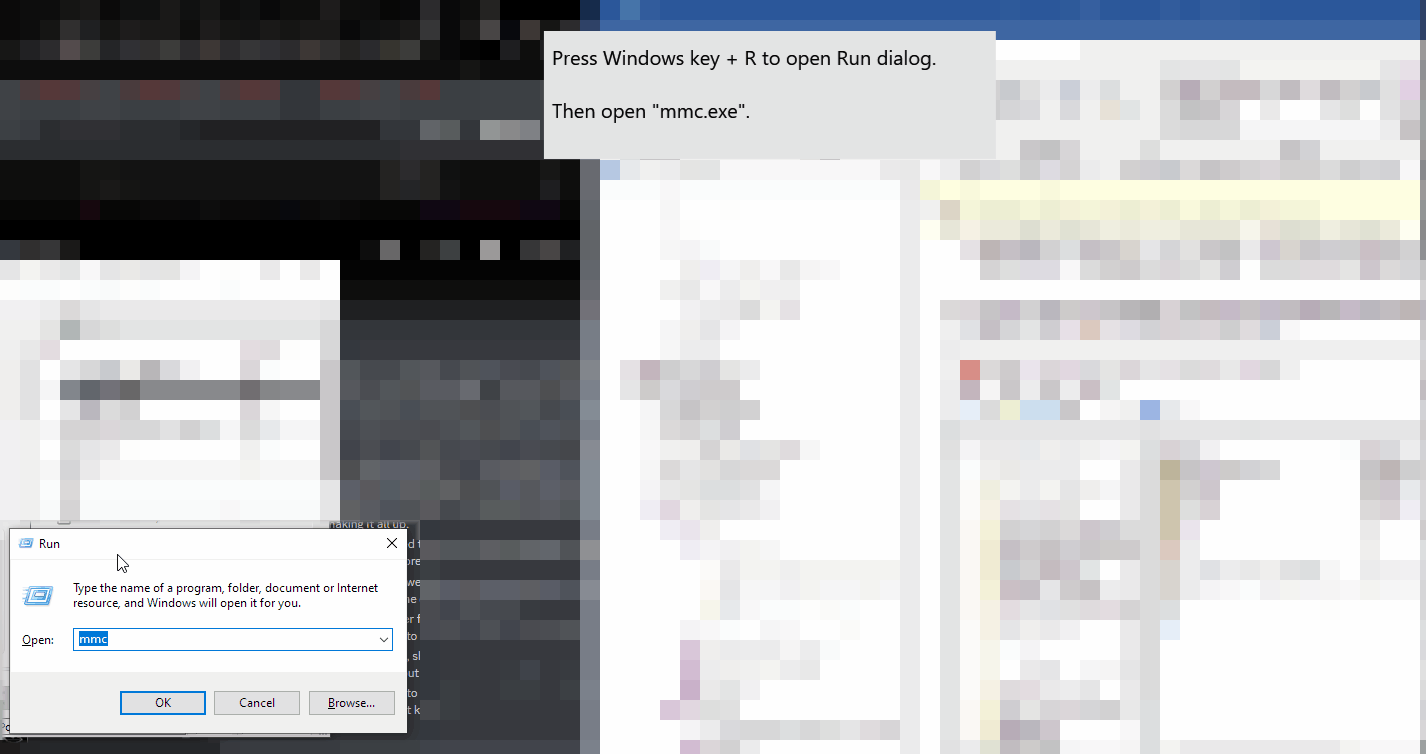
Step 2:
To find the newly generated certificate, open MMC, add the Certificates snap-in for User Account, and look under Personal > Certificates. The certificate will have an expiry date of one year.
This gif shows how to use MMC:
Step 3:
To trust the new certificate, you will need to move it from Personal store to Trusted Root Certification Authorities store. Simply drag and drop it to Trusted Root Certification Authorities > Certificates.
You will get a popup warning about it. Press OK.
You can then run a Blue server and use the certificate under Root store:

Local browsers running on the machines with the installed certificate should show the connection as secure. If they don't, and claim the certificate is invalid, try restarting the browser, and if it's still not working, try waiting a few minutes.
Self-signing for domains
You can also generate self-signed certificates for domains or subdomains, not just localhost, but you'll need to set up port forwarding, and set up the domain's DNS records to point to your server machine (both of these are explained under Guides > Hosting a server topic).
But if you're doing that, you might as well just get a free globally-trusted certificate, as described above, rather than using self-signed which will only be trusted on your testing machine.
You can always get a subdomain certificate so your main live servers aren't affected.
You can also create fake DNS records and redirect locally, using a host file redirect, but this will only work on your testing machine.
It is recommended that if you want anything more custom than what free providers give by default, or you want to export or convert the certificate formats, that you use the free OpenSSL tools (direct download). There are plenty of online OpenSSL guides.
If you have a PFX certificate file but don't have it in the certificate store, simply right-click the file in Windows Explorer and press Install to install them to the local certificate store.
If there is no Install option, the certificate is likely not in a format Windows supports natively, and you'll have to convert it using OpenSSL.
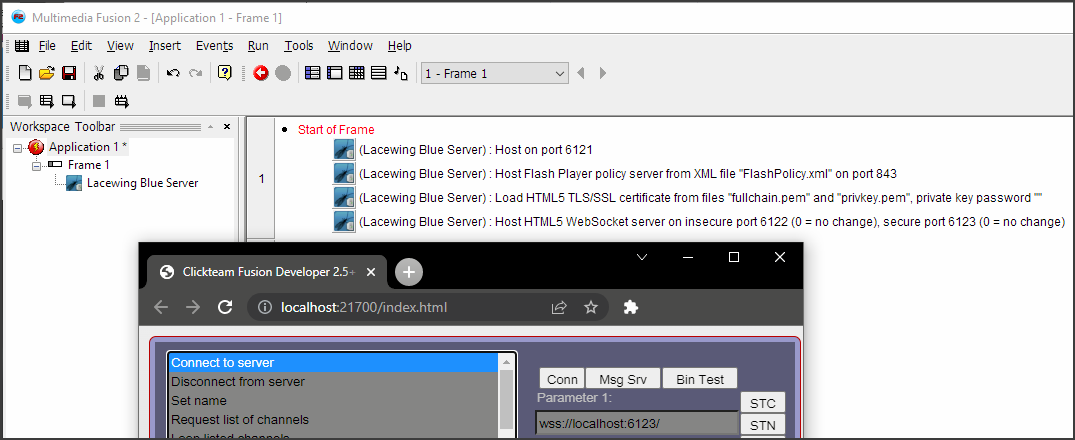
How to load a certificate in Blue Server
You can load the TLS certificate by either of the loading actions, then start the WebSocket secure server afterwards.

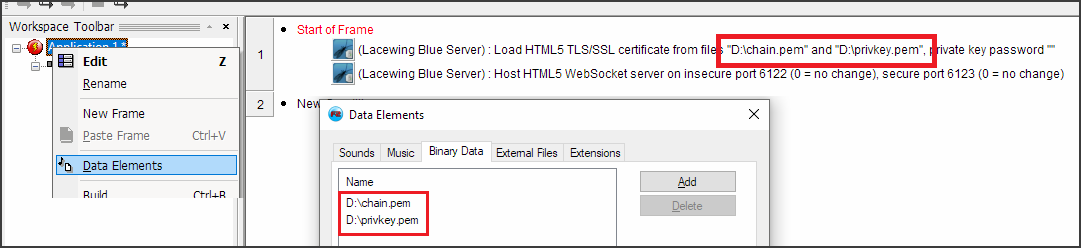
It's worth noting you can refer to files by their full path, or by embedding the files inside Data Elements.
If using embedded files, you do not need to extract them beforehand; just use their original filepath. Blue will extract them if necessary.
This code will work on all Blue Server platforms:
On Android/iOS, it is recommended you embed the certificates on Blue Server running , as otherwise finding the path of the files is very difficult; both mobile platforms heavily restrict apps' access to file systems to specific folder paths.
Be aware embedded files are not designed to be hidden from users. Don't give out an app with a certificate that you don't want others able to pull for their own servers.
Certificate expiry
Free TLS certificates normally last around 90 days, and normally a TLS provider will give you a tool that will automatically refresh the PEM files when they start getting out of date.
Paid TLS certificates can only last a maximum of ~13 months (~397 days), as mandated by the website security community, Certification Authority/Browser Forum.
Blue Server has an expression to get the date and time that the currently loaded certificate will expire, under WebSocket Server > Get TLS cert expiry date.
An expiring certificate will need replacing with a newer one. The TLS provider should give you a way of automatically renewing with an ACME client (Automatic Certificate Management Environment). You can also manually renew them, although you should not do that until reasonably close to expiry.
Once a new certificate file is available, just use the new PEM files in the same certificate load action.
(Updating a certificate while server is running should just work without needing to restart the server or disconnect anyone, but this has not been tested yet.
If you get errors or crashing replacing a certificate while the server is running, make screenshots and logs of the errors and contact Phi on Clickteam Discord. Try not to close the server, even if it has stalled, as it will be easier to debug when open.)
How to convert certificate formats
Possible certificate, certificate chains and key file formats are explained here.
To check what a format a file is, you should also try opening the certificate files in Notepad, as many formats have a plain-text header.
It is recommended you use the free OpenSSL tools (direct download) to convert between formats.
There is an list of OpenSSL conversion commands as well as online converter here. Use the online converter at your own risk.
Faking a domain for tests
You can use a hosts file redirect to pretend you own a domain or subdomain, without actually owning it, and without setting up a port forward.
Add a host file entry, which is just a domain -> IP entry in
C:\Windows\System32\drivers\etc\hosts
For example, to redirect testserver.example.com to ip 127.0.0.1, it's as simple as:
testserver.example.com 127.0.0.1
Now you can go on a browser to https://testserver.example.com/ and it will be as if you connected to https://127.0.0.1/. This also works for WebSocket connections, regular Relay connections, etc; all domain -> IP translations done by the OS will be affected.
When looking up a domain's IP address, the host file is checked first, then DNS servers are queried.
Note these host file entries need to be set for any client machine, and require admin permissions to do so.
So it's not very useful outside of testing.
You can easily confuse yourself with host file entries, due to hosts file overriding public DNS records, so you could break your public DNS settings, and host file entries hide the problem; or you could break your host file and your public DNS is fine.
So, use hosts file redirect only temporarily, and revert your changes later.
Common certificate errors
Error finding certificate in store – Cannot find object or property
Error 80092004
Either the store/certificate files couldn't be read, or the details you gave for finding the certificate inside the store were not valid.
For example, misspelling the crediential's common name. Certificate files like PEM are not just one certificate, they can include multiple certificate's details, so it is necessary to identify the correct one by name.
If using the Windows store, ensure you also have the correct location, "My" for personal, "Root" for Trusted Root Certification Authorities. Find the correct certificate location via MMC, which is shown in the GIF above, and compare it to your certificate loading actions.
the credentials supplied to the package were not recognized
Error 8009030D
This means the certificate was found, but private key was unreadable to the user. This is because users cannot read private keys from all the certificate stores by default.
First, ensure the private key is associated with the certificate – to see how, use MMC, which is shown in the GIF above.
Second, grant access by finding the certificate as shown in above GIF, right-clicking the certificate, selecting All Tasks > Manage Private Keys…, and adding the Users role to have read permissions.
Alternatively, run your program as administrator to give it access to other stores like Local Machine.
Certificate common name invalid
NET:: ERR_CERT_COMMON_NAME_INVALID
This is from the client trying to connect to the server using a domain/IP that the server's certificate does not identify for.
Although you might be accessing the same machine that's on the certificate, e.g. accessing by IP instead of domain, TLS/SSL certificates require an exact hostname match to identify the server.
So although localhost becomes IP 127.0.0.1, accessing https://127.0.0.1/ when the server has a certificate only for localhost, will result in this error.
The error will not be created when you load the certificate. You will instead get this error on client side, when a client tries to connect. The server will get a handshake failure.
To fix this, ensure you've selected the correct certificate, and that your certificate identifies the domain/IP you're connecting to exactly. Most browsers will let you view the certificate that failed by press Advanced on the browser's error page and observe the details there.
Alternatively, click the Not Secure sign, and you can see the domain name there.
If you want to do local tests for a server, using an existing domain certificate, but your test machine is not where the domain points to, consider using the host file redirect temporarily. It will let you fake a domain/subdomain pointing to a different IP address, as if the public DNS says it is, which will bypass this error.
You may find it's easier to just get a new subdomain and a free corresponding certificate, though.
Certificate authority invalid
NET::ERR_CERT_AUTHORITY_INVALID
This is from the certificate being loaded, but not trusted; for example, not inserted in the Windows certificate store, or not present in Trusted Root Certification Authorities.
The error will not be created when you load the certificate. You will instead get this error on client side, when a client tries to connect. The server will get a handshake failure.
To fix this, move or copy the certificate to Trusted Root Certification Authorities via MMC (which is shown in above GIF).
Secure handshake failure – the parameter is incorrect
Error 87
This indicates something went wrong, probably on the client's side. Client side errors are also reported to the server, as the secure connection setup failing is considered to fail on both sides, as neither agree.
Generally, this indicates the browser tried to connect in a way that's not supported; for example, connecting to secure port with insecure socket (http, ws), connecting with the wrong domain/IP for the certificate (common name invalid), etc.
Non-WebSocket connection response to URL
Blue Server is not designed to be a HTTP/HTTPS server, but it supports the barebones, enough to start a WebSocket connection on top of a HTTP/HTTPS server, which WebSocket standard requires.
This error indicates a browser connected instead of WebSocket. Lacewing Blue handles that without a problem, and will instead reply to browsers with a short text page, where images and the domain's icon (favicon) are loaded from Darkwire Software (loaded by the browser, not by the server).
You do not need to worry about this error; Lacewing simply lacks an information-level reporting system, so until that's changed, information messages are reported as errors.